Introduction
A "LAMP" stack is a group of open source software that is typically installed together to enable a server to host dynamic websites and web apps. This term is actually an acronym which represents the Linux operating system, with the Apache web server. The site data is stored in a MySQL database, and dynamic content is processed by PHP. In this guide, we'll get a LAMP stack installed on an Ubuntu 16.04 Droplet. Ubuntu will fulfill our first requirement: a Linux operating system.Prerequisites
Before you begin with this guide, you should have a separate, non-root user account withsudo privileges set up on your server. You can learn how to do this by completing steps 1-4 in the initial server setup for Ubuntu 16.04. However the initial setup is quite a pain. Installing applications and working with the Linux command line are not the easiest of things. But installing Apache, PHP, MySql & phpMyAdmin is not difficult, as long as you stick with the process. In fact you can have a fully functional LAMP stack by executing only 10-12 command line operations ! Follow the steps given below, one by one.Step 1 : Updating the Package List
Update the package list on your system so that you can have the latest available versions of Apache, PHP, MySql and phpMyAdmin.sudo apt-get update
Step 2 : Installing Apache
Install Apache through the following command :sudo apt-get install apache2Note that it will install the latest available version of Apache.
Step 3 : Checking Successful Installation of Apache
You can check whether Apache has been installed by typing in the IP address of your server http://your-ip-address (or http://localhost if you're doing it on a local server). You should see a page like this :Step 4 : Installing MySql
Install MySql through the following command :sudo apt-get install mysql-serverYou will also be asked to enter the desired password of the MySql root account. Although it is optional, don't leave it. The default password of the root account is blank, and instead of changing it later on, better do it now.
Type in a strong password and press the arrow-down button to highlight the Ok button. When highlighted the Ok button will turn red. Press the enter key to proceed. You will also be asked for a confirmation of the password. Repeat the same. The latest available version of MySql will be installed.
Step 5 : Checking Successful Installation of MySql
Type the following command :mysql -u root -pIf MySql has been installed successfully, you should be prompted for a password. Enter the password which you chose in the above step. You should see the MySql prompt like this :
mysql>Here you can run mysql queries, create tables etc. Now to go back, exit MySql by typing in the command :
exit
Step 6 : Installing PHP with Commonly Used Extensions
Install PHP and commonly used extensions :sudo apt-get install php libapache2-mod-php php-mysql php-curl php-gd php-json php-mcrypt php-zipIn the above command in addition to PHP, the following PHP extensions are also installed :
- MySql Extension : To use MySql functions available in PHP
- Curl Extension : To make CURL requests through PHP, commonly used in implementing API calls of web services
- GD Extension : To enable the GD library. PHP uses GD library for image manipulation tasks
- JSON Extension : To decode and encode JSON through PHP
- Mcrypt Extension : Contains various encryption functions
- Zip Extension : Zip and unzip through PHP
Step 7 : Checking Successful Installation of PHP
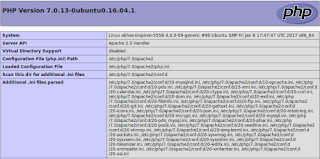
Type the following command :echo "<?php phpinfo(); ?>" | sudo tee /var/www/html/phpinfo.phpThis will create a phpinfo.php file in the root directory. Type this url in the browser http://your-ip-address/phpinfo.php (or http://localhost/phpinfo.php if installing locally). You should see a page like this, showing your PHP configuration :
Step 8 : Installing phpMyAdmin
Install phpMyAdmin through the commannd :
sudo apt-get install phpmyadminYou will be asked to choose the type of web server. The default choice would be apache2. Press space key to select. Now press Tab key to highlight the Ok button. Now press the enter key. Pressing key in this order is very important, otherwise apache2 will not be selected. When selected apache2 would have a * symbol beside it, see the second image how it would look like.
You will then be asked whether to configure database for phpmyadmin with dbconfig-common. Choose Yes and click enter.
You will then be asked to enter the password of MySql root account. Enter the password which you typed while installing MySql. Use the Tab key to highlight the Ok button and press enter. Do the same when asked for password confirmation.
The latest available version of phpMyAdmin will be installed.
Step 9 : Checking Successful Installation of phpMyAdmin
Visit the url http://your-ip-addrss/phpmyadmin (or http://localhost/phpmyadmin) in your browser. If phpMyAdmin is installed successfully, you should see the standard phpMyAdmin login page. Type in root as the username, and the MySql password you chose earlier to access the databases.Step 10 : Enable Apache Rewrite Module
Enable the Rewrite Module in Apache, so that your application can make use of seo-friendly pretty URLs, such as http://yourwebsite.com/posts/12/post-on-ubuntu/ (instead of http://yourwebsite.com?post_id=12).Most probably you will be needing pretty URLs in future, better enable it now.
sudo a2enmod rewrite
Now restart Apache so that this change becomes live.
sudo service apache2 restart
If still your http://your-ip-addrss/phpmyadmin is not showing you can use following command to edit your apache2 config details.
sudo vi /etc/apache2/apache2.confADD Following line after IncludeOptional sites-enabled/*.conf
Include /etc/phpmyadmin/apache.conf


sudo service apache2 restart
That's it. You should have a fully functional LAMP stack. You can start writing your code now !


